Monday

Brown Sugar Cookies

These are from the recipe on joythebaker.com. They were pretty yummy!

Fresh Figs

Picked from the backyard! I never knew my sister had fig trees. I had never tried fresh figs before this summer at the farmer's market. Thank you farmer's market, you have introduced me to many lovely foods.

Banana Bread


I had a bunch of bananas who had seen better days and were just begging to be made into bread. I didn't have any eggs so I googled "vegan banana bread" and found this recipe from a site called "Cookie Madness." I didn't make a truly vegan bread because I used half & half instead of the soy milk that was called for and butter for the pan, but was so happy with my results! The texture was nice and it was very yummy. I would definitely make this bread again. It is a very simple bread with no added nuts or chips, but I don't think it needs anything more. I adjusted to recipe based on what I had at home, here is the recipe exactly how I made it:
 
 Banana Bread
adapted from cookie madness

Ingredients:
1/4 cup half & half 
1 teaspoon rice vinegar
2 cups all purpose flour 
1/2 teaspoon baking soda
1/4 teaspoon salt
1/2 teaspoon cinnamon
1/4 cup vegetable oil
1/4 cup olive oil
1/2 cup brown sugar
1/2 cup white sugar
3 ripe bananas
1 1/2 teaspoon vanilla

 - Preheat oven to 350 degrees 
- Butter your loaf pan generously (mine was 9x5), lay a sheet of parchment on the bottom and butter that as well.
- Add vinegar to the half & half and let sit.
- Mix together the flour, baking soda, salt and cinnamon.
- In a large bowl, beat together oils and sugars and add in bananas, mashing them with a pastry blender (or a potato masher would work too. You can use a mixer if you prefer, I just like to see banana chunks in mine).
- Add vinegar/half & half mixture to it and stir well. 
- Add half of the flour mixture and once that's incorporated add the rest of the flour until it is well mixed, try not to over-stir. 
- Bake for an hour or until a toothpick inserted in the center comes out clean.

Cool on a rack and enjoy! 


Wednesday

Monday's Cookies


If I could improve in one area right now, it would be in piping. I am just not very good at it. So naturally, my favorite cookie style is either plain or one of these swirly ones because the colors are supposed to mix! And sanding sugar is also a nice covering.


These flowers are also another another style to practice. I recently bought some luster dust and experimented with brushing some shiny-ness onto them. I am not sure if I like the silver color though, I think I might buy a few more shades of dust. It is a nice little addition though. I need to find more ways to use the stuff.


Monday

A Trip to the Farmers Market

Every Saturday there is a farmers market here in old town Orange. I love going by and looking for pretty produce, especially heirloom tomatoes. They are so colorful! Expensive too, that's why I look for mini ones so it doesn't cost me a fortune.

Mini 'Maters


Lunch


Green Zebra Tomatoes


Blood Orange


There is also a stand there that sells asian fruits and vegetables, so interesting! I love seeing all the variety in nature, God is so creative!


Tuesday

Ruffle Cake


If you are into baking blogs at all, I'm sure you know this cake is all the rage now a days. Just do a google search for "ruffle cake" and many cakes just like this one will pop up. I just had to try my hand at it though because It's just so dang pretty!  

As far as I know, this was a Martha Stewart design and it can be found at her site here. Other blogs I have seen this on were i am baker and at sweetapolita.com and all over the Sweet & Saucy Shop blog. You can even see a youtube tutorial from the Sweet & Saucy Shop here.
If you are a baker you should try this out, it's simple and girly. I made this one for a bridal shower. In case you can't tell, the thing on top is a little candle in the shape of a pink and purple castle. I found it at the kids party section of Target but I thought, brides want to feel like a princess on their special day, don't they? 


Saturday

Camo Cookies


The theme of my work's Vacation Bible School this year was "B.O.O.T.Camp"... an acronym for something but now I don't remember what. Oops! I think it was Biblical Outlook and Outreach Training? Anyways, my boss asked me to make 100 sugar cookies to pass out to everyone at the end of the week. This was the largest amount of sugar cookies I have ever made at once! It was a lot of work, man.  I used this decorating tutorial from Sweet Sugar Belle's website. It was fairly simple once I got the hang of it, especially because camoflauge is a random pattern anyways.


Here I have them all packaged and ready to go. This was a good learning experience and I am happy for the chance to have made such a large order. Here are some things I learned:

1. Always bake extra cookies. In case some of them come out a little deformed or in case I get distracted while cookies are in the oven and some come out a little too toasty.
2. When working with cold dough, make sure it has had time to thaw before rolling. I never usually chill my dough but I did this time so I would be able to spread the work out over the week. The day after I baked I felt like I was beat up! My arms were sore and my hands hurt for days from pressing down on the rolling pin.
3. Never, NEVER cover cookies with wax paper. Even if they look dry, they night not be. I always hate leaving cookies out to dry overnight because I feel like there should be some covering. I had made half of them in the afternoon and when the time came to sleep I though, they look dry, I'll just cover them overnight. The next morning the paper had dried on in spots on at least half of my cookies, peeling off the royal icing when I removed it. It was a sad day. Luckily, my boss said they still looked fine and I didn't need to remake them.
4. I should invest in re-usable piping bags. I went through so many!
5. Make sure the icing is the right consistency before loading it into a bag. I filled up 4 bags, began piping and realized it was too stiff and had to empty out all 4 bags to fix it. It was a total waste of time.


6. If there are extra cookies and icing, make more of the cookies you are supposed to make instead of trying out other stuff like I did here. This is sorta like #1. It would have been nice to have made some extras so I could pick out any if I didn't like them.


Do you have any good tips to share from past baking experiences? Leave me a comment!

Tuesday

Dulce de Leche Icebox Cake


This recipe is really just a sham, there's no new recipe in this post, it is simply a combination of graham crackers and classy cream layered in a yummy ice box cake.  

I work at a church and have the opportunity to meet many church members who attend activities throughout the week. One lady, Betty, recently turned 90 years old. I thought I would make her something to celebrate and figured this was simple and tasty. But then I went and had to bake my own cookies for it, taking away the simple factor... but it's still tasty which is all that matters for the reciever of the gift.


Isn't the bowl on the left cute? I found it at an antique store in the Orange circle.

Directions:
Stack alternate layers of graham crackers and classy cream until its about cake height. Store-bought crackers should work just as well if you don't want to make them.
I used a #21 piping tip for mine to make it look fancy.
Place cake in the freezer for a half hour so the top will set a bit before covering it in plastic wrap and setting it in the fridge. Refrigerate this 8-24 hours before serving cold. The longer it sits the more cake-like it will be.
Before serving, drizzle more dulce de leche sauce over the top (optional).


Friday

Sugar Cookies

When I decorate sugar cookies, I love how they look right after the royal icing has been put on the cookie, while its still shiny and pretty before it has dried.


The cookies above became these below.

I made them for a baby shower. I used a brush embroidery technique but totally didn't come up with the design at all. These were inspired by these fabulous cookies from the Amber Spiegel blog. I first found her stuff through etsy and just love the stuff she makes. And I love how she paints with luster dust, so pretty!


My cookies aren't as perfect, but I'm still practicing.

Wednesday

Graham Crackers


When I saw this recipe for homemade graham crackers on the Smitten Kitchen blog, I thought, these crackers sound amazing, I should make these. 
This recipe does make a fabulous graham cracker, but I did not cook them as long as they needed and they came out soft. I don't have a real oven and the toaster oven I use tends to burn things when I use the noted oven time so my time guesstimate wasn't long enough.
I have to be honest, these cookies were a pain in the butt to make, but I am impatient and think I probably made it harder than it should have been. Even so, I could totally see myself making these once a month if I had kids, just to avoid store bought ones. Then I know exactly what is in it and besides, home made always tastes better doesn't it?
I have included notes at the end of the recipe, please learn from my mistakes. It is clear to me that I am not good at following directions since I missed steps along the way. My rolling process seemed more difficult from the Smitten Kitchen one, but here is my experience.


Graham Crackers
from Smitten Kitchen

2 cups plus 2 tablespoons unbleached all-purpose flour
1/2 cup whole wheat flour
1 cup dark brown sugar, lightly packed
1 teaspoon baking soda
3/4 teaspoon salt
7 tablespoons unsalted butter, cut into 1-inch cubes and frozen
1/3 cup clover honey
5 tablespoons milk (full-fat is best)
2 tablespoons vanilla extract

Topping
3 tablespoons granulated sugar
1 teaspoon ground cinnamon

To make the dough:
Combine the flour, brown sugar, baking soda, and salt in a large bowl with a pastry blender (a food processor can also be used but I don't have one). Next, add in the butter and continue to blend it together until it is well combined and looks similar to a coarse meal.

In another bowl, whisk together the honey, milk, and vanilla extract.

Add it to the flour mix and combine it with the pastry blender until it forms a dough. It will be sticky.

Lay out a layer of plastic wrap on a counter and dust flour over it. Plop the dough onto it and form it into a rectangle-ish shape about 1 inch thick. Wrap it completely, then chill overnight.

The next day:
Prepare the topping by mixing the sugar and cinnamon together in a small bowl and set it aside.

Unwrap your dough and cut it in half  and return one half to the refrigerator. Spread out a piece of wax paper on your work space and liberally dust an even layer of flour onto it. Roll the dough into a long rectangle about 1/8 inch thick.
The dough will be really sticky and you will not be able to lift it off the wax paper.
This is where I cut shapes into the dough. It is a lot easier if you cut it into squares or rectangles, but if you use cookie cutters, press the shape in and don't touch it. Don't try to remove the excess dough, it will be a mess.
Place the wax paper onto a cookie sheet and chill until firm, somewhere around 30 to 45 minutes in the fridge or 15 to 20 minutes in the freezer.
After it is firm, then you can peel away the excess dough and carefully pull off your shapes. Dip both sides into the cinnamon mix and place on a baking sheet. Make a separate ball with the scraps, wrap in floured plastic wrap and refridgerate it. Repeat the cookie process with the second half of the dough.
After all the scraps are chilled you can repeat the process with that as well.

Heat oven to 350°F.

With the cookies on the cookie sheet, you can make the indentations with a toothpick for decoration if you want. I don't think it affects cooking, so you can leave that part out if you want.

Bake for 15 to 25 minutes, and rotate the sheets halfway through. It should look browned (it should also be firm to the touch)

Notes:
* This dough is really sticky. Add more flour if the rolling gives you trouble.
* Make sure you THOROUGHLY chill the dough, especially if you use shapes. I have no patience and I rushed it, which (I am sure) was what made it difficult for me.
* Touch the cookie to make sure it is firm (another step I missed).

Sunday

Classy Cream

For any of you who have felt a lack of creamy goodness in your life, this cream is the answer for you. It's richer than regular whipped cream due to the addition of mascarpone cheese and fancier than whipped cream due to a large amount of dulce de leche. These fancy additions are the reason I chose to call this "classy" cream. I mean really, the majority of its ingredients are in a foreign language. Classy. It can be served with a bowl of fresh strawberries for dessert. Classy. It looks good in a glass dish. Classy. And above all, my friend Eunice enjoys this cream and, if you know Eunice, she loves luxurious things and has some pretty high standards. Classy.      

Classy Cream (Dulce de Leche Mascarpone Cream)
yields: around 4 cups

2 cups heavy cream
1/2 cup + 1 Tbs. dulce de leche sauce
8 oz. container of mascarpone cheese

Chill bowl and mixer beaters in the freezer for at least 15 minutes.
Using chilled items, beat together dulce de leche and cheese until well combined.
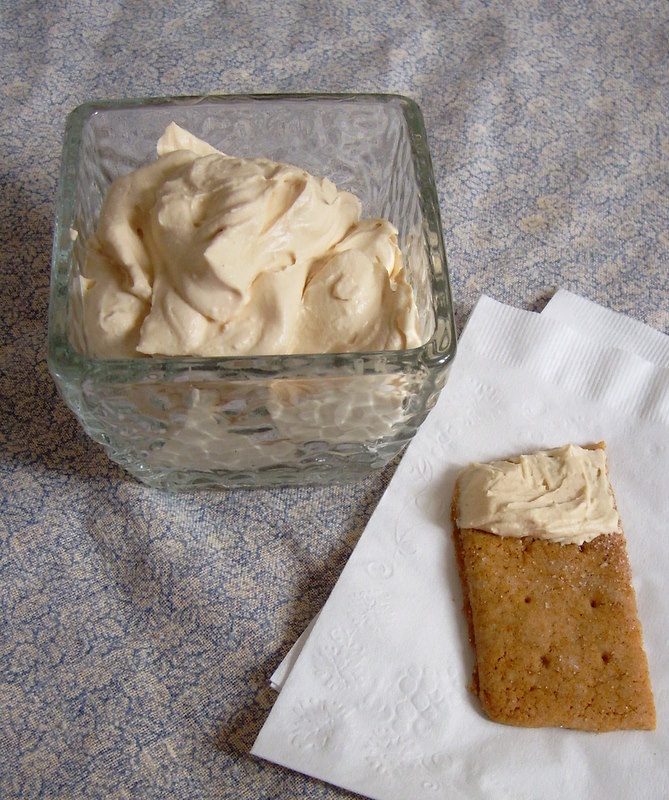
Add heavy cream and beat until it has a stiff consistency. The picture below is what mine looked like.


This recipe makes a whole lot! Layer it in a trifle, spread it on graham crackers, dip things in it, do what your heart desires. Or you can halve it and no one will be the wiser.  

This recipe can be made a day ahead of time, just make sure you beat it well in order to get a good consistency.

Friday

"You're so furry and black, what's with that?"

This is Ojos our cat.

What's that you say? This is a baking blog, what does my cat have to do with it? 
Well, Ojos, puts the "love" in Butter, Sugar, Love. Yes!..
I know.
He has his evil days. He'll hiss in my face if I hold him too long and runs under the bed so we can't pick him up. But we like to think he enjoys being owned by us. Somewhere deep down in his black kitty heart. 
At least we like him. And we all know he's better off with us than in the streets fighting off strays and catnip pushers. J.boo even writes songs about him. The title of this post is actually a line in one of his many Ojos jingles. Maybe I shouldn't admit that online. Anyways... 

Ojos facts:
*He is about 3 years old now
*His name means "eyes" in Spanish
*My sister named him that because she said he had big eyes as a kitten
*He is really talkative
*He loves all dairy products, cheese, ice cream, yogurt, it's all good
*He drools when he's happy
*He likes to lay on the edge of our matress with his front arms hanging over the side, pressing on the bed frame like this:
I caught him sticking his tongue out.
It's weird isn't it?


 We love Ojos.

Saturday

Cherry Bliss Bars


I know, this picture doesn't look that great (and if you want a good picture you can look at this one), but this bar is SO DELICIOUS you will not believe it until you make it. I found this recipe on the What Megan's Making blog as one of her 12 days of Christmas cookie posts and it is a homemade version of the Starbucks cranberry bliss bars. Seeing as how my husband works there and we just love all things Starbucks, I had to try this! 

Recently I am fortunate to have an abundance of dried cherries and thought, this would be a good use for them. I have always liked the store bought bars and get them every year around Christmas so I wanted to make these to compare. It IS very similar, and really tasty. The frosting is sorta gooey, but I put them in the fridge and like how they taste cold, it helps the frosting harden up a bit. I took them to a party/cookie exchange last night and my friend texted me this morning saying they were, "super scrump!" ( Seinfeld reference, anyone?), and should have taken more.
I am listing cherries in the recipe since that is how I made it and I really liked how it turned out with them but one day I will have to make the cranberry version.


Cherry Bliss Bars
adapted from what megan's making, originally seen on my little mochi


Bars:
1 cup (2 sticks) butter, softened
1 1/4 cups brown sugar
3 eggs
2 teaspoons vanilla
1 teaspoon powdered ginger
1/4 teaspoon salt
1 1/2 cups all-purpose flour
3/4 cup dried cherries, chopped
3/4 cup white chocolate chips (or chopped white chocolate)

Frosting:
1/2 cup + 2 Tbs. cream cheese, softened
3 cups powdered sugar
zest of 1 orange
1/4 tsp. salt
4 teaspoons orange juice
1/2 teaspoon vanilla
1/3 cup dried cherries, chopped

Drizzling Icing:
1/2 cup powdered sugar
2 tablespoons vegetable shortening
1-2 tablespoons milk

Preheat oven to 350 degrees and liberally butter a 9x13 pan*. Set the pan aside for later. Beat butter and brown sugar with a mixer until creamy. Add eggs, vanilla, ginger and salt and beat well. Gradually add flour, making sure its well incorporated (I did this with a spoon, not the mixer). Stir in cherries and white chocolate. Pour the batter into your pan and spread evenly with a spatula. Bake for about 30 minutes, until toothpick inserted comes out clean and it is a light brown color.

For frosting, beat cream cheese, powdered sugar, salt, vanilla, orange zest and juice until smooth. Top completely cooled cake with frosting and sprinkle the chopped cherries on top.

For drizzle, in a small bowl, mix together the powdered sugar, shortening and milk, adding milk gradually until it becomes a drizzling consistency (almost 2 Tablespoons.) Then spoon it into a plastic bag and cut off a tiny corner, then drizzle it over the frosting. You won't need all of it.


*The butter should help it come out, just make sure not to overcook it because it will get a little tough. I had a hard time cutting it but it might have been because I overcooked it a little. And, I may or may not have put the batter in to bake without the cherries or white chocolate and had to take it out while it was hot, emptying it out into a bowl and then emptied the batter back in without re-buttering it... which may or may not have made it a little hard to cut out.

Chocolate Transfers


I made cookies for my work Christmas potluck using candy melts and chocolate transfer sheets. It was my first time using them and it was really pretty simple. I don't imagine making these too often, but I would totally make these for special occasions!
I looked up alot of YouTube videos on how to use the sheets and on the first one I used, I spread out a layer of candy melts on the sheet and refrigerated it until it was dry, then used a cookie cutter to try to cut out the shapes... and that was a total waste. It looked so simple on the video, but in reality it cracked the candy into lots of little pieces and didn't work at all. Maybe it was only supposed to dry partially before cutting? With these I cut the sheets so they would fit over the cookies, then spread a layer of chocolate on my cookie and pressed the sheet on it lightly. Then I waited for it to dry and peeled off the sheet, this worked really well for me. I decorated a cross shaped cookie and also an ornament shape and I think that simpler shapes work best because details get a bit lost when the sheet is pressed down. I would totally recommend trying this out and if you like this design, you can find it here at the Fancy Flours website. I also tried out this pattern but I would NOT recommend it because it looked really bad. I tried it on red candy and it looked like a crusty white covering and the pattern didn't come out at all, I also tried it on white and the design was so light I could hardly see it. Maybe it needs a brown chocolate background, I don't know.
Aside from the transfers, I also made some cookies with a spread of red candy melts and white pearl candy.


Sunday

Double Chocolate Snack Cake

 This cake recipe is one of the few recipes I tried  from a Betty Crocker cookbook and, all I can say, is the people behind Betty know their stuff. The recipe is pretty simple and if you follow the directions as written, you don't even need a mixing bowl! You just plop everything together in the baking dish and stir before popping it in the oven, no need to waste precious minutes on dish washing. I don't always do it that way, but if you're in a hurry its a great idea!
I really like this recipe because not only does it taste good, its not hard to make and pretty cheap since it doesn't require any butter or eggs. HAVE YOU NOTICED THE PRICE OF BUTTER LATELY?? The local store sells a pack of 4 sticks for $4.50. It makes me sad, I remember when it was $2.50 and I foolishly took it for granted... but I digress. I think this type of cake can be considered a "depression cake" because its missing butter, egg and milk. And that makes it vegan too... I'm pretty sure.
For this cake I made two layers of this snack cake and filled and covered it with a basic buttercream frosting and a dusting of cocoa, but all of that is totally not necessary. I made single layer and served it with a dusting of powdered sugar at our small group and it was good like that too. Like it's name says, it's a good cake to have for snacking.

Double Chocolate Snack Cake
from Betty Crocker's 40th Anniversary Cookbook

1 2/3 cups all-purpose flour
1 cup packed brown sugar
1/4 cup cocoa
1 teaspoon baking soda
1/2 teaspoon salt
1 cup water
1/3 cup vegetable oil
1 teaspoon vinegar
1/2 teaspoon vanilla
1/2 cup semisweet chocolate chips

Heat oven to 350. Mix flour, brown sugar, cocoa, baking soda and salt with a fork or whisk in an ungreased, 8x8 square pan. Stir in remaining ingredients except chocolate chips. Sprinkle chips over batter ( I mixed mine in).
Bake 35-40 minutes or until wooden pick inserted in the center comes out clean. Cool on wire rack. Sprinkle with powdered sugar if desired.

Buttercream Frosting
3 cups powdered sugar
2 sticks softened butter
1 teaspoon vanilla
about 2 tablespoons whipping cream

Gradually mix sugar in with the butter. Beat with a mixer until combined. Add liquids and beat for a few minutes until fluffy.

Wednesday

Tea Party

My sister asked me to make cookies for her tea party and gave me her teacup cookie cutters. I thought I would go with fall colors, brown and orange, but they really didn't turn out like I had expected. Wilton's copper coloring looked the same as orange from the container so I thought, what the heck, I'll give it a try. they ended up with a salmon-y color instead of orange, but I was ok with it. These pictures arent the best quality since I don't have a real camera, but i'm sure you get an idea of how they were.  


Large Teapots


Small Teapots


This one was my favorite


I like how they came out in the end and my sister was happy with them. :)

Friday

Red Pepper Bisque

I love this soup recipe! I don't think i'm much of a cook but this is a recipe that i've made several times since finding it last year. I consider it to be a "girly" soup, something that would be nice as a part of a tea party. It's very yummy and rich because of the heavy cream. Yes, heavy cream is our friend!...for this recipe at least. It's a really nice soup to have on a cold day (too bad we haven't had many of those here in so. cal this week).


Red Pepper Bisque
Adapted from Bon Appetit

4-5 large red bell peppers ( I have also used a mix of red and yellow and that works well too) 
3 1/2 cups chicken low-salt chicken broth (2 cans) 
1 teaspoon paprika
1 teaspoon sugar
3/4 cup whipping cream
1/2 cup finely grated Romano cheese
1/2 teaspoon red pepper flakes
salt, pepper to taste
basil for garnish (optional)

Char your bell peppers over a gas flame using tongs to turn and make sure you get all the sides pretty black and charred. Cover them for about 15 minutes so they become soft so you can peel the skin off. I've heard of different ways to do this, I usually out them in a bowl and cover them with dish towels and a plastic bag... i think I may have seen my mother do this, but do whatever works for you! Peel and seed the peppers and cut them into small chunks. Combine your peppers and chicken broth in a large saucepan. Boil, then reduce heat and simmer until peppers are tender, about 5 minutes.
Turn off the heat and in batches, puree the soup in blender until smooth. Be patient and be very CAREFUL! You don't want to splatter scalding hot broth all over, so small batches work nicely. If you have a cheap blender like I do, you might want to cover the top with a dish towel and press down on the lid so it doesn't spray stuff when you start it. Return blended soup to your saucepan. Mix in paprika, sugar and red pepper flakes. Simmer 5 minutes to blend flavors. With a whisk, mix in the cream and Romano cheese, make sure cheese has melted before adding salt. Season to taste with salt and pepper, garnish with basil and if you like, serve with toasty bread.


Thursday

Crack Pie


This recipe comes from Christina Tosi, pastry chef at Momofuku Milk Bar in New York.

According to what I've read, people really like this pie and want to keep eating it after trying it, hence the name Crack Pie. I knew I just had to make this crack pie to see if it's all it's cracked up to be...HA!
All kidding aside, it was a good pie. Really good. Other reviewers have called the taste similar to pecan pie without the pecans. I have never had pecan pie so I wouldn't know. Jason and I tried it and the first thing we thought was blondies. It tastes like BLONDIES in pie form! Probably from all the brown sugar, but what's not to love about that? The crust is really good and I think it would be good in other pie recipes as well.
I especially liked the fact that the recipe used powdered milk, I have a big bag of it from making ciabatta bread and I don't know what else to use it on. I don't know if this is something I will make very often, as blondies are alot easier to make and will supply me a similar taste, but it is yummy and worth trying.


Crack Pie
From Bon Appetit

Oat Cookie Crust:
Nonstick vegetable oil spray
9 tablespoons (1 stick plus 1 tablespoon) unsalted butter, room temperature, divided
5 1/2 tablespoons (packed) golden brown sugar, divided
2 tablespoons sugar
1 large egg
3/4 cup plus 2 tablespoons old-fashioned oats
1/2 cup all purpose flour
1/8 teaspoon baking powder
1/8 teaspoon baking soda
1/4 teaspoon (generous) salt

Filling
3/4 cup sugar
1/2 cup (packed) golden brown sugar
1 tablespoon nonfat dry milk powder
1/4 teaspoon salt
1/2 cup (1 stick) unsalted butter, melted, cooled slightly
6 1/2 tablespoons heavy whipping cream
4 large egg yolks
1 teaspoon vanilla extract
Powdered sugar (for dusting, I forgot to dust mine)

For the crust:
Preheat oven to 350°F. Line 13x9x2-inch metal baking pan with parchment paper; coat with nonstick spray. Combine 6 tablespoons butter, 4 tablespoons brown sugar, and 2 tablespoons sugar in medium bowl. Using electric mixer, beat mixture until light and fluffy, occasionally scraping down sides of bowl, about 2 minutes. Add egg; beat until pale and fluffy. Add oats, flour, baking powder, baking soda, and salt and beat until well blended, about 1 minute. Turn oat mixture out onto prepared baking pan; press out evenly to edges of pan. Bake until light golden on top, 17 to 18 minutes. Transfer baking pan to rack and cool cookie completely.
Note: this dough was one of the stickiest doughs I have ever worked with, I had to spread it with my hands and really buttered them.

Using hands, crumble oat cookie into large bowl; add 3 tablespoons butter and 1 1/2 tablespoons brown sugar. Rub in with fingertips until mixture is moist enough to stick together. Transfer cookie crust mixture to 9-inch-diameter glass pie dish. Using fingers, press mixture evenly onto bottom and up sides of pie dish. Place pie dish with crust on rimmed baking sheet.

For the filling:
Position rack in center of oven and preheat to 350°F. Whisk both sugars, milk powder, and salt in medium bowl to blend. Add melted butter and whisk until blended. Add cream, then egg yolks and vanilla and whisk until well blended. Pour filling into crust. Bake pie 30 minutes (filling may begin to bubble). Reduce oven temperature to 325°F. Continue to bake pie until filling is brown in spots and set around edges but center still moves slightly when pie dish is gently shaken, about 20 minutes longer. Cool pie 2 hours in pie dish on rack. Chill uncovered overnight. 
Can be made 2 days ahead. Cover; keep chilled.

Tuesday

Cookie Angels

At my work, they have members bring cookies every Sunday and the people who sign up to bring them are called "cookie angels." My manager Vanessa and I signed up together and I made these sugar cookies inspired by Amanda's (@ I am Baker) V-day cookies. I loved the hearts and wanted to give it a try. Again, these are blurry phone pictures because I took them with my phone. Someday I will get around to buying batteries for our digital camera!


These were made with royal icing. I wanted to make them blue and white but I think the blue is lighter than I had hoped, I was just afraid to put too much coloring in because I have heard that too much will make it taste bitter.  


I still have alot to work on, but I think I am content with how they turned out.
Related Posts Plugin for WordPress, Blogger...